Introduction
Arch Linux is my favorite Linux Distrubtion, it’s minimal, and has a lot of community support. Why Arch Linux ?
- You can proudly say: BTW i use Arch Linux :D
- Keep it simple
- Do it yourself ( DIY ), configure it once and use it all the time
- AUR ( one of the largest Linux packages repository )
- Rolling Distro ( no versioning ) you feel this impact if you are using the system for many years
- Bleeding Edge, Arch Linux really strives to stay bleeding edge, Arch Linux typically offers the latest stable version of most software
I been using Arch Linux since 2013, and initially i faced many challanges to running it, specially on the period nvidia support was not as easy as it’s today.
However it’s worthy experince. also again you get intitle to say the famous powerfull magic word when you get in arugment with any other Linux user, I Use Arch Linux BTW.
I originally wrote this post in 2019, prior to the installation script that Arch shipped by default now with Arch ISO, the old way is still valid and give better insight of how Linux subsystems connected togather and you will learn more about the commands.
But there is no harm in using the new way, either way i have documented both ways.
If you are using windows, with no previous knowledge to Linux in general, then i recommend you to start using Linux with other distro like Ubuntu or Mint then when you feel comfortable jump to Arch Linux.
I will assume you are a basic Linux user and have simple knowledge of working with the command line.
Prepare for the installation
Arch Linux by default use online repository during the installation. but there is a way to create a local repository hosted on the USB. something bigger than 8 GB is more than enough.
We will use fdisk to partition our USB stick, we will create 2 partition:
- Partition will hold the Arch Linux ISO installer, and we going to configure to be bootable in both UEFI, and BIOS, 1GB is enough for this partition.
- Partition will hold configuration + Local repository for offline Arch Linux installation.
Assuming the usb have sdj as drive letters
|
|
The below commands are as follow
o -> n -> default enter -> default enter -> default first sector -> last sector +1GB -> a ( flag it as bootable ) -> n -> default enter -> default enter -> default first sector -> default last sector -> w
|
|
For the first partition we will use FAT file system, for the second partition we will use EXT4.
|
|
Bootloader
Bootloader is a piece of software responsible for loading other software which is the kernel. afaik there is 2 type of booting your system, the legacy way is using BIOS, while the modern secure way is using UEFI .
There is mutiple boot loader the work with Linux, systemd now eat a lot of other software, and it has it own bootloader which work only with UEFI, however since this boot loader is for the USB live system it self, i will be using GRUB. GRUB support both way of booting. check this comparsion table on Arch Linux wiki to compare all boot loader that work with Arch Linux and their Firmware support.
The only other option i might consider other than GRUB is systemd-boot, systemd-boot only support UEFI, most modern computers support UEFI from long time.
We going to configure GRUB to boot with both way, BIOS and UFEI, just in case.
Preparing the boot partition, in order to support both modes ( this is for the installation media (USB stick ) to boot, not the intended final system installation ), we going use DD command to dump the iso into the first parition we have created previously, and modify some text to use UUID to track the disk instead of disk labels.
Follow the below commands.
|
|
Depending the way the system was booted ( BIOS or UEFI ), different configuration file will be used, in case of UEFI archiso-x86_64-linux.conf will be used, for BIOS archiso_sys-linux.cfg will be used, we will insert the disk UUID in both files in order to support both ways.
First obtain the boot partition UUID by using ls
|
|
UEFI
change the archisodevice as below
|
|
|
|
BIOS
change the archisodevice as below
|
|
|
|
Unmount the USB, generally for Linux you will need to disable the secure boot from your mother board settings.
Plug the USB into your device, navigate to the boot menu, usually you will find the USB manufacture name in the menu, choose UEFI if possible.
To verify that Arch Linux booted successfully, you should find root@archlinux on the left side. congratulation now we are going to do some configure for the local repository before installation Arch Linux.
Prepare the system
What a lovely message :
|
|
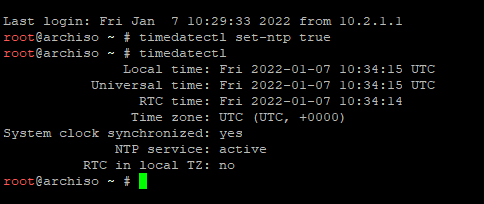
First thing first, set time correctly and activate NTP
|
|
Check your available disk, and locate the USB drive and the your main system drive, there must be an entry for each hardware harddisk you have.
|
|
Mount the second partition on /opt/arch
|
|
Network configuration
check your interfaces with
|
|
For Ethernet interface, your should have an IP assigned to your machine, if the above command showed an IP, then you are good to go, try to ping some website e.g. duckduckgo.com or something to double check your internet connection.
For Wireless check your Wireless interface name, it’s usually something like wlan0, it’s not easy to configure Wireless using command line, however it’s not that hard too. you will need the SSID for the network you will connect to.
SSID = your network name along with the WiFi password on the below command, you can name the file anything instead of SSID
|
|
Create local repository
Creating the local respository will allow you to install Arch Linux offline, you can skip this section if you will always have internet connection, for me at least i will keep local repository for faster installation.
Clean up the second partition by deleting lost+found directory ( this directory get created when you format the drive with EXT4 file system ), and make our own pacman configuration file, pacman is Arch Linux package manager. you will use pacman a lot.
Create the following Directories:
1.pkgs - to store the packages
2.db - database files only and packages signatures
3.gpg - clearly GPG keys will be stored here
|
|
I like keeping the configuration file clean, and remove commented lines to make it easier to track. so i have removed all commented lines. in the bottom we will define our local repository. ironically we will comment our local repository for now, until it’s ready.
|
|
Initilaze the directory with the needed GPG keys, we will need to specifiy the configuration file path, along with GPG directory path.
|
|
The output should be something like this.
|
|
Download the needed packages to the local repository, clearly we will not mirror the entire Arch Linux repository, the following packages consider enough for normal Arch Linux system.
|
|
You can extended the list as you like but keep in mind your USB stick capacity.
|
|
It’s trival to create Arch Linux repoistory, it’s just with one command. you can uncomment the repository from pacman configuration file.
|
|
You now have an installation media ready to be used to install Arch Linux, there is a lot of different ways to install Linux in general, however i have 2 approaches.
First approach, is doing the command by your self manually, this will have high risk of forgetting something, and require great knowledge of what you are doing 🤦♂️, but it’s really fun at least for me, i love learning by mistake it give you a deeper understanding of how the system work.
Second approach, is using the default installation script that is shipped with Arch Linux, it’s actually really cool and give you a lot of options and really fast the only missing part atm is configuring pacman to use the local repository instead of online one then you are ready to use the script
There is no harm of doing it both ways, over and over again, and improving your setup each time.
I recommend you to document your process, make a github repository to hold your configuration file, it will be expanded later and have more value with team.
For the Linux enthusiasts like me, use something other than github ( since it’s owned by Microsoft 🤷♂️ ) or even better host your own git server.
First Approach
Partition
This step is highly depend on your main operating system disk, and once you become an expert you can try different file system other than EXT4, i will try to keep it simple while secure as possbile, we will encrypt the main disk for Arch Linux and use LVM for better disk performance and flexibility.
There is a common knowledge, that when you delete a file you actually only deleting an entry from the INODE table, to really erase the file you will also need to zero the bytes on the hard disk itself, there is multiple way of doing this, you may refer to Securely wipe disk , for more information.
I will be using shred command for clearing the hard drive, this is a very slow process you may skip this step if you don’t care.
The following command will fill the disk with random data, and it will do this 3 times ( don’t ask me why it’s paranoid mentality 👀), again this command will take very long time even if the disk space is small, i wont use it in the main Arch Linux disk since this disk get written very often and most files are only operating system files however if you want you can do it ( it’s always why not ? not why 😜 ).
|
|
As we discussed before, we will support the 2 firmware mode of bootloading, so will make 3 paritions in total:
1.BIOS bootloader partition ( 512MB )
2.UEFI bootloader partition ( 512MB )
3.LVM parition ( all the reset, since we will partiton this one with lvm command later )
commands: g -> n -> last sector +512MB -> n -> last sector +512MB -> t -> 2 -> 1 -> n -> t -> 3 -> 30 -> w ( for the last one dont enter any thing in the last secotr and just press enter ).
Now we will partition you main computer hard drive, we will create 3 partitions, one for bios as fall back, EFI, and LVM partition that hold the OS. Im doing this installation on Virtual Machine, so it can be easier for me to copy the output, however it should be almost the same on your physical machine.
We will utilze fdisk again 😊, this time assuming hard drive letter is vda
|
|
command sequence: g -> n -> default enter -> default first sector -> +512MB for last sector
Now you have created the first partition successfully.
|
|
command sequence: n -> default enter -> default first sector -> +512MB for last sector -> t -> default enter -> 1
Now you have created the second partition successfully, change the type of the parition to be EFI system.
|
|
command sequence: n -> default enter -> default first sector -> default last sector -> t -> default enter -> 30
Now you have created all partition and change the type of the third partition to be LVM.
|
|
Command sequence: w to write the changes to the disk.
|
|
Formatting the BIOS partition to be EXT2 ( we are using EXT2 because of the same size).
Formatting the UEFT partition to be FAT32.
|
|
We will Encrypt the main partition that will hold Arch Linux, we will use cryptsetup utility.
Use the below command to encrypt vda3 partition.
Confirm the choose with all capital letters YES this will erase the existenanc drive, enter your encryption password twice for confirmation.
Losing the encryption password will result in data loss forever, however we will setup an encryption key-file later on as backup way of accessing your drive.
|
|
|
|
Create encryption key, you may store this encryption key of your USB stick
|
|
Add the encryption key to the drive
|
|
The encryption information is stored at the beginning of the hard drive, so if anything got corrupted to the disk header, it will result in lockdown of the data with no way of restoring it. it’s good practise to also take a backup of the disk header
|
|
Before configuring LVM, you will need to uncrypt the drive and mount it
Replace dev name with device letter vda3 in our case, and choose a name for the mounted disk
|
|
Now configuring LVM, LVM is really cool way of utilizing your hard drives.
Covering LVM is beyond the scope of this article, however you may read more about it in LVM
To keep it simple, LVM create group of volumes and then partition them internally, you need to pick a name for this group, i choosed iUseArchBtw 😜.
pvcreate to initialize physical volume
vgcreate to create volume group
lvcreate to create volume, there is multiple option to size the volume you are creating -L to specify the exact size of the volume or using -l 100%FREE to use the reset of available unused space
|
|
Assuming you have a basic understanding of the Linux filesystem, it’s up to you how to partition your disk, a simple way you can start with is to create 2 parition
1.Root - to hold the installation for Arch Linux, logs and packages
2.Home - to store your user account data if this paritition for any reason got full your system will still operate normally, it wont distrube your Linux system
At later stage you can play around with more option like different file system or make a backup partition, /var partition to hold only logs, you can also keep it simple and not over engineer it
Format the partition with the following commands
|
|
Start the installation process and mount all drives on /mnt
|
|
Stay clean and remove all lost+found directories from all the newely created partition
Installing the Arch Linux from our local repository, we going to use pacstrap command which uses pacman to pass the configuration file use -C option.
Install the base & base-devel package group as starting point, we will chroot later to the system and install more packages
pacman keep a internally database for all installed packages on your system, if you install package from outside like here, the internal database of pacman wont recongize that the package has been installed, so to stay clean we will keep only 2 group packages
|
|
Umount the local repository partition and mount inside Arch Linux
|
|
Arch-chroot is really magical command, you are now in your future Linux system, i really like it 😉
|
|
Setup a password for your root account so you don’t forget about it, if you forgot this you will need to boot again from USB unencrypt your drive arch-chroot again and then setup a password 😁
Also create a separate user than root
|
|
Mount the local repo parition.
|
|
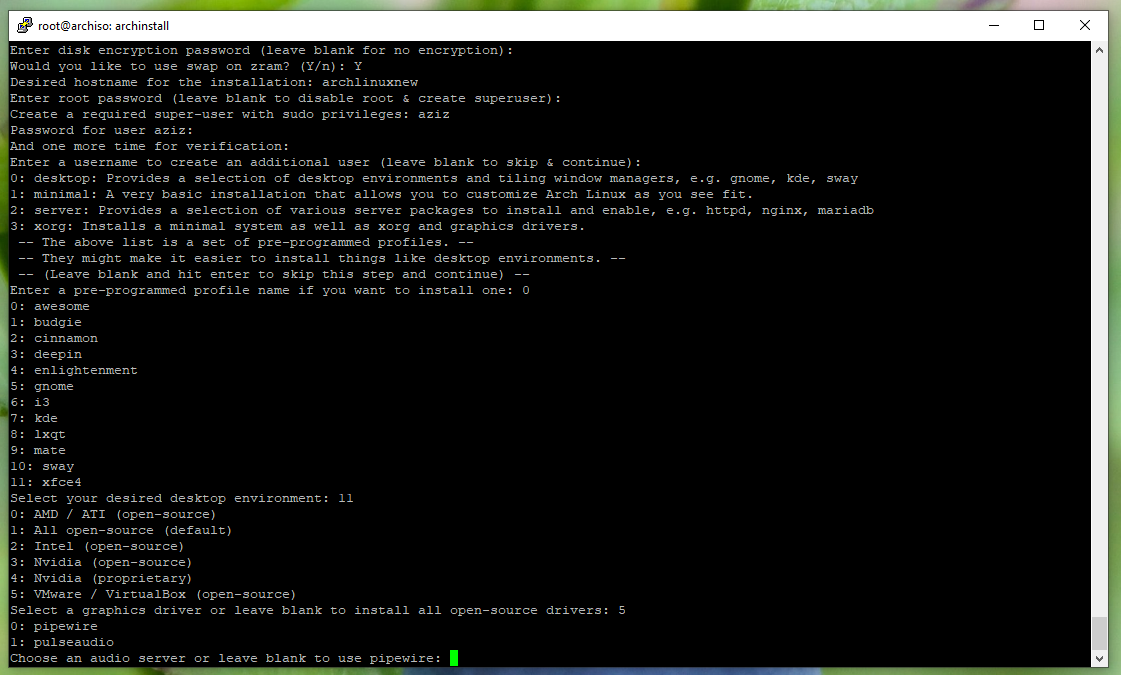
Install nessery packages, you will customize your system now, hardware drivers ( e.g. GPU nvidia or AMD ), desire desktop manager, and so on.
I will be using xfce4 since it’s simple
|
|
Configure time zone and locale
|
|
Ramdisk
Linux boot process consiste of multiple stage, something at BIOS or UEFI, and then your bootloader like GRUB, then you will load something called initial ramdisk, we will use mkinitcpio to initate our ramdisk.
To load encrypted drive we will need to add some hooks, the order of these hooks matter
The 2 hooks we are going to add are encrypt & lvm2 edit the file /etc/mkinitcpio.conf
|
|
Add encrypt & lvm2 between block & filesystems as below
|
|
Run mkinitcpio command to initial the ramdisk, Arch Linux support multiple kernel, LTS and hardened and zen, you will need to do the below step for each kernel version you have installed
|
|
GRUB
We need to configure GRUB to prompt us with unlocking the encrypted drive, we going to modifiy default GRUB command line options
|
|
You will need to add the desire drive to unencrypt it, the option is cryptdevice, replace the device name with your own and LVM group with the name you choosed eariler
Add apparmor parameters so later on you can use apparmor
Your configuration file should look something like this
|
|
Since UEFI can be booted from BIOS but not the other way around, try to use UEFI when possible, to install GRUB UEFI execute the below command
|
|
If you don’t want to install GRUB in UEFI, and want to use BIOS, use the bellow command
|
|
Generate the configuration file for GRUB, i choosed english language.
|
|
To boot into graphical user interface, you need DisplayManager, every Desktop environment have a DisplayManager, the DisplayManager is not restricted to a Desktop environment, gnome gdm can be used with xfce4
I will be using lightdm DisplayManager for now
To make lightdm work properly, it come with various greeter software, greeter is the piece of software that will prompt you for login, there gtk greeter and web greeter, i will be using gtk greeter for now
Edit lightdm configuration file, look for greeter-session, and modify as below.
|
|
|
|
Enable the lightdm service to start with system startup also enable NetworkManager service so you can have internet connection after reboot
|
|
This is the end of the installation process, exit your Arch-chroot with Ctrl+D, umount all drives and reboot your system
|
|
Unplug your USB stick, hopefully everything went fine, and you should have lightdm gtk greeter window, login with your user ( don’t user root )
Even we went through a lot to install Arch Linux, this is should be simple setup. Approach two should be a lot easier since we going to use installation script.
Second Approach
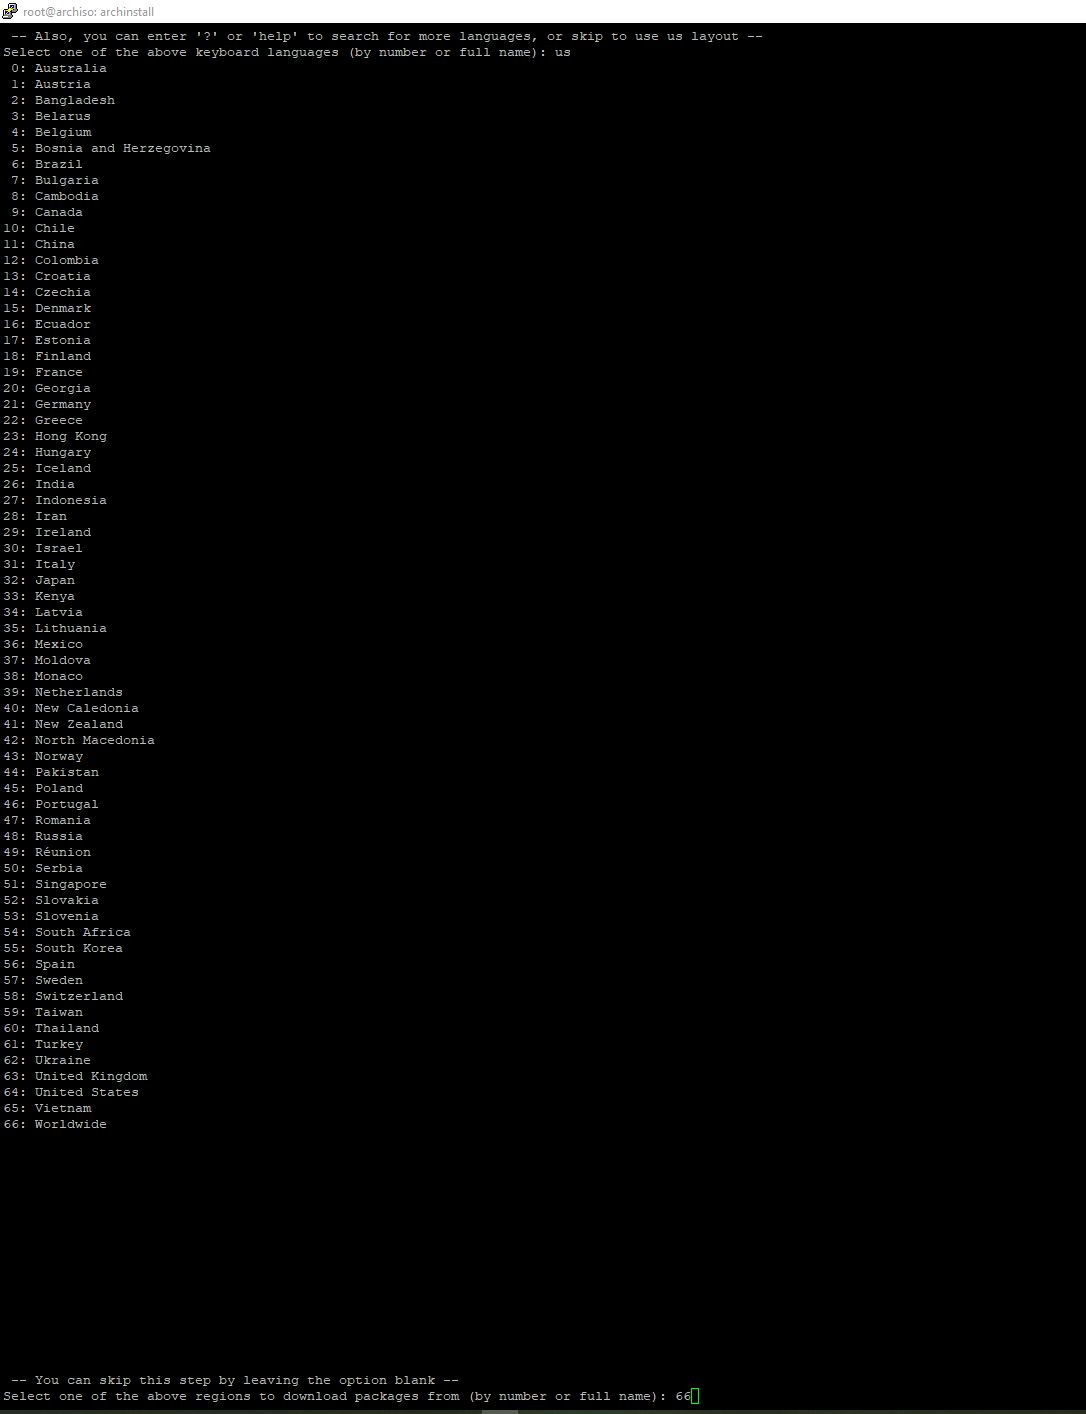
As stated before, Arch Linux now shipped with installation script to automate the installation.
After booting Arch Linux enable ntp with
|
|
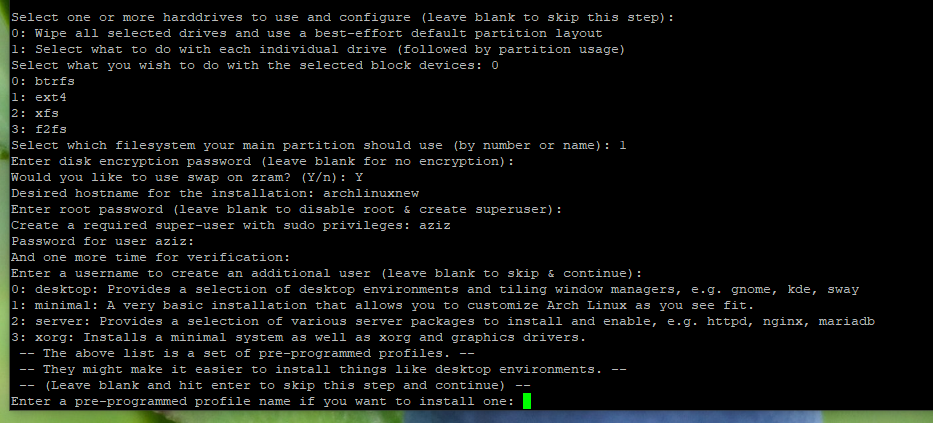
Start the script with
|
|

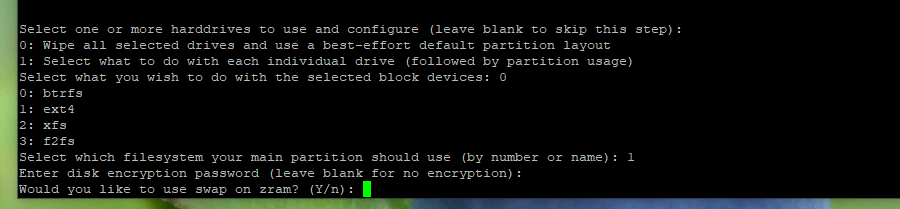
This is important step, choose the right drive, since i’m using virtualbox i have only one drive /dev/sda which is number 1
 It always better to wipe the drive unless you have dual boot
 EXT4 is the simplest option and that what I’m going with

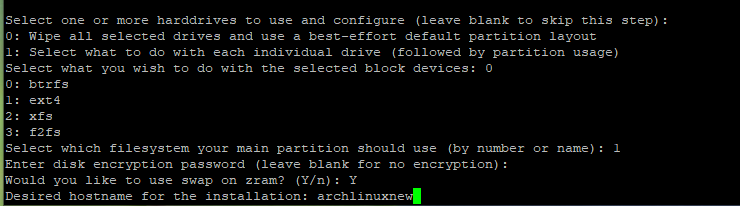
I really like this option, i will go with Desktop
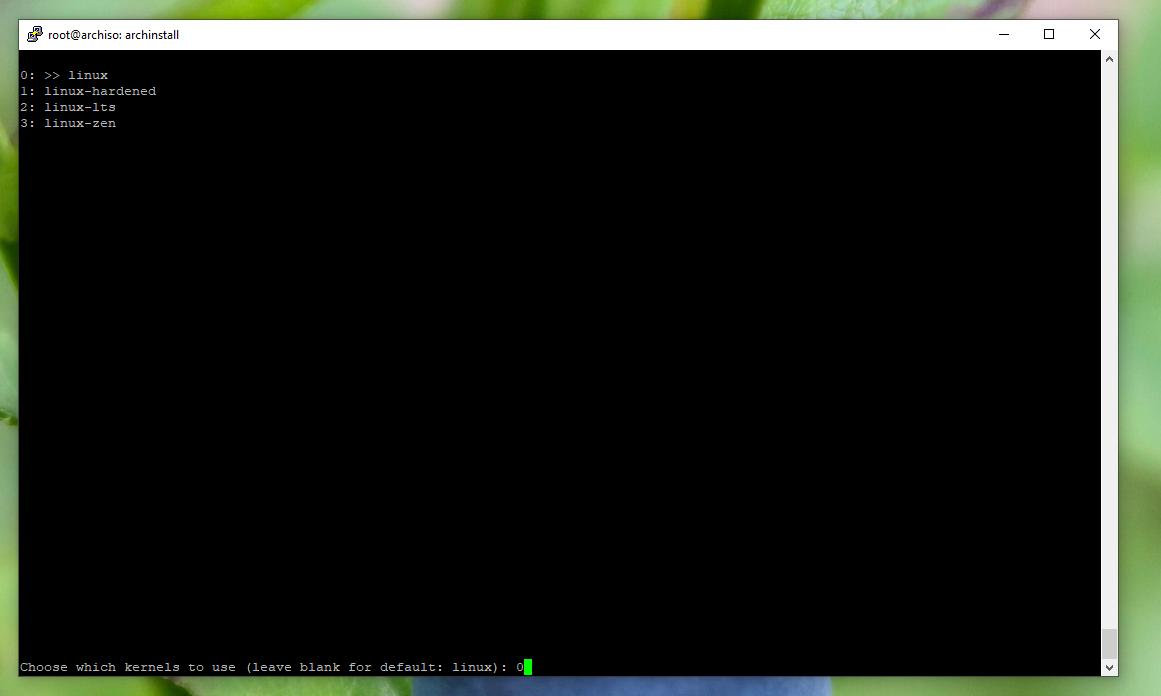
Arch Linux come with 4 type of kernels, easiest is Linux which is the default


Verfiy your configurations, and that’s it
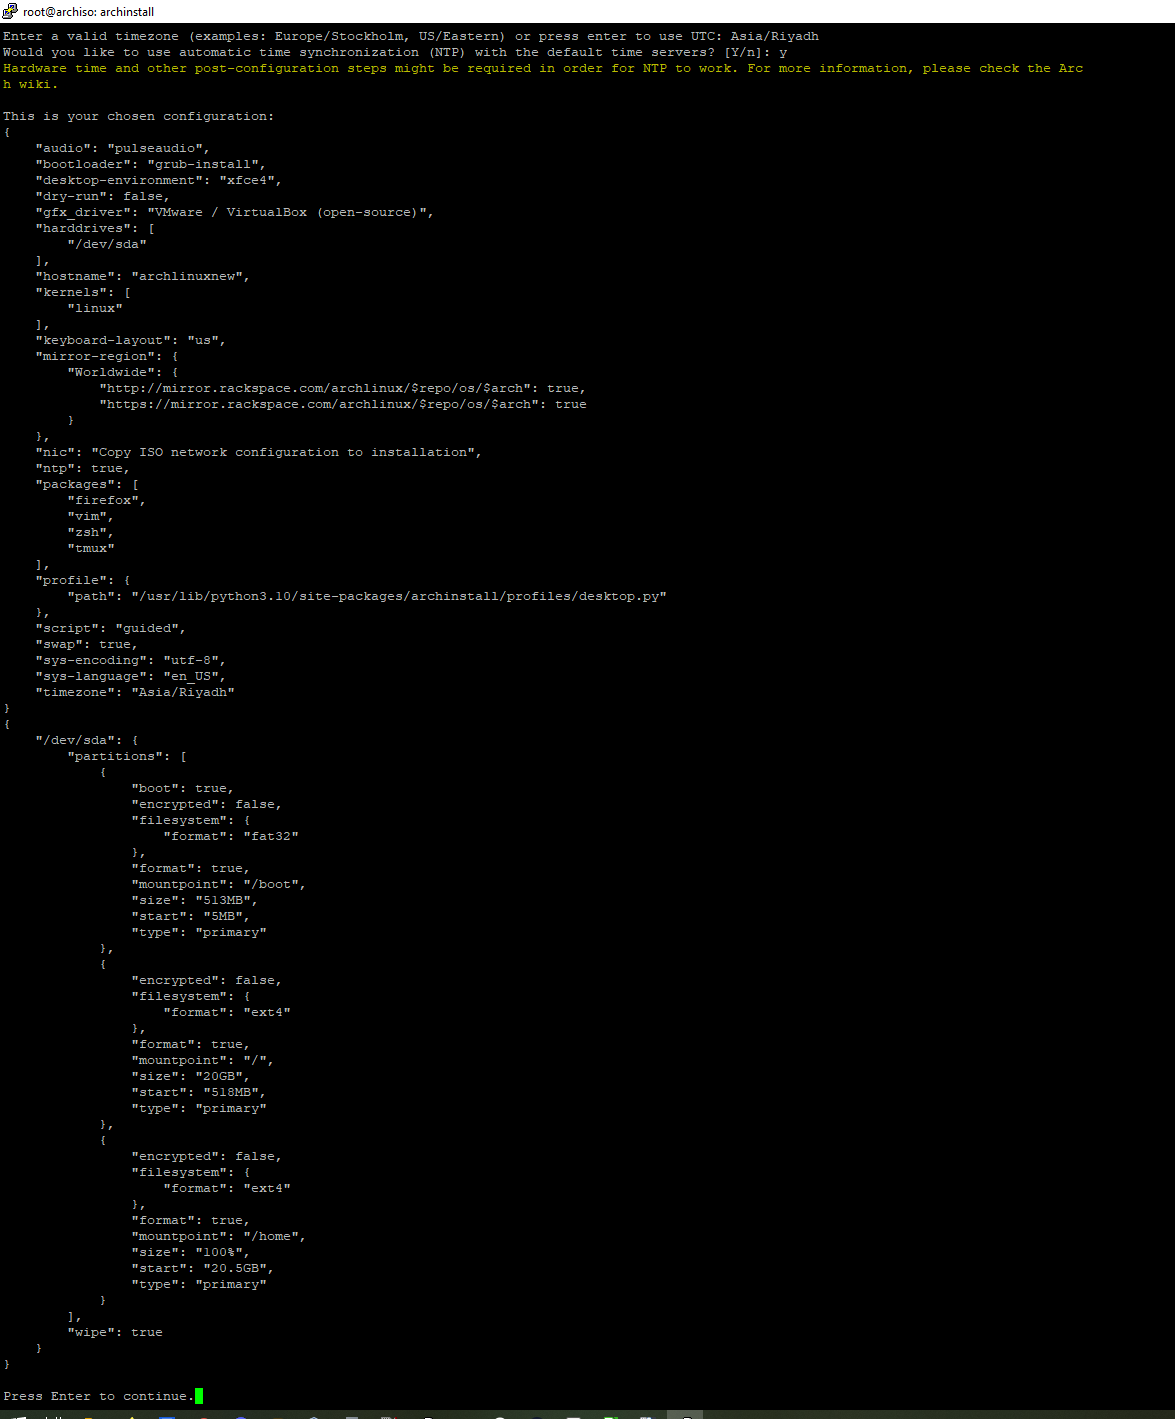
The installation script make it a lot easier and faster than approach one, the only problem is faced was with the mirrors.
References
USB_flash_installation_medium#In_GNU/Linux_2
GRUB#UEFI_systems
Arch_boot_process#Boot_loader
Microcode
LightDM
Lenovo_ThinkPad_X1_Extreme_(Gen_2)
this post has been updated on 15-01-2022